Pigeon
Bulk Scheduled Cloud Messaging
Submission for Makers SDS
I was recently learning about how notifications work for another project i was working on and i discovered that there are little to none free,open source solutions to schedule notfications in bulk. So i decided to create a service that makes this easier using webhooks.
Pigeon is a self hostable service that lets you do the following things:
- Schedule push notifications in bulk
- Create template Notifications and Dispatch them through you backend via a simple webhook
Pigeon is built on top of ExpoPushMessaging for a few straight forward reasons:
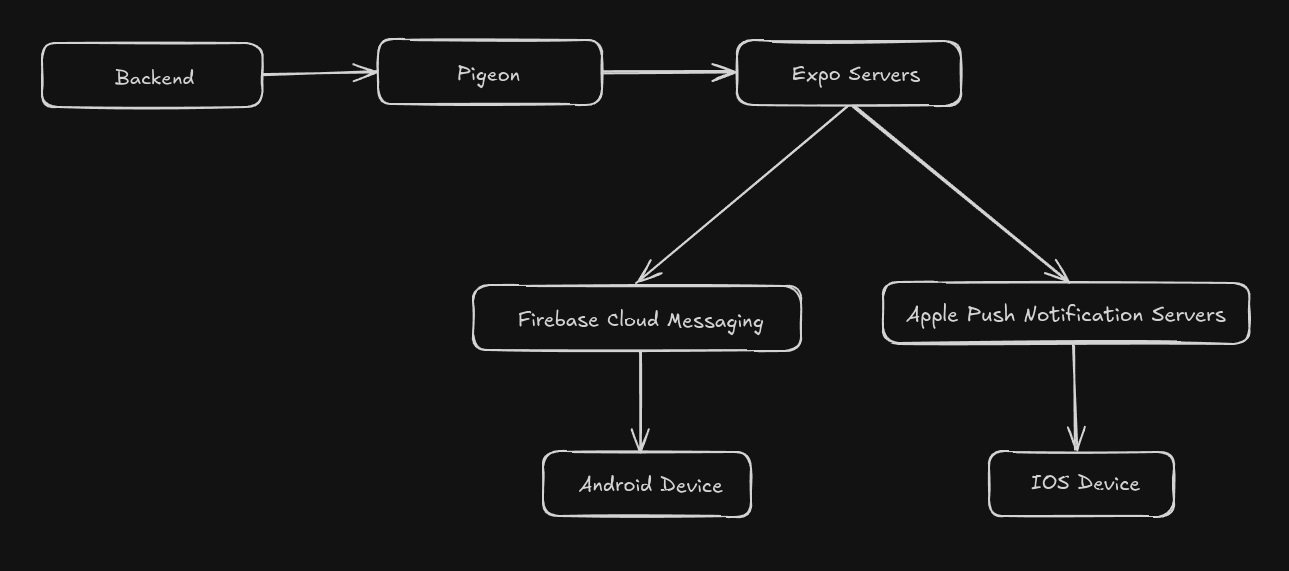
ExponentPushTokensunlikeFCM(FirebaseCloudMessaging)tokens do not expire and is fixed for a device and installation instance.ExponentPushTokenscan be used for both IOS and Android Push Messaging
Pigeon sits between your backend and ExpoPushMessaging Servers
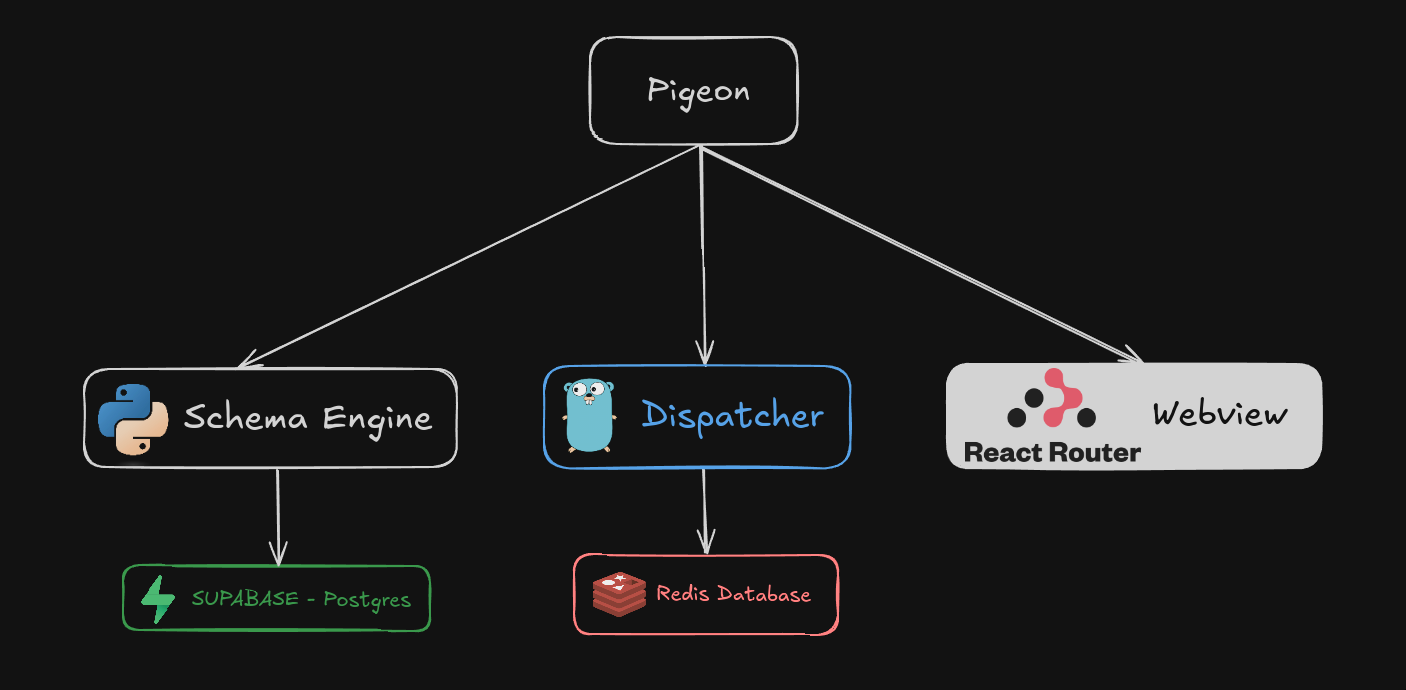
The Pigeon Stack Consists of 3 Micro-services
- Dispatcher
- The Dispatcher is responsible for queuing notifications and sending them when their
scheduled_attime is reached. A REST-API interface allows to append new orders and start/stop the dispatcher. - The Orders are stored in a redis database for fast CRUD operations
- If any expired
ExponentPushTokenis found then a post request is sent to theDELETE_WEBHOOK_TOKEN_URLconfigured in the.envfile - The need for concurrency here made me choose golang for this application
- The Dispatcher is responsible for queuing notifications and sending them when their
- Schema Engine
- The Schema Engine is responsible for creating,dispatching and processing templates.
- Each template is defined by what i call
TemplateTextwhere the stuff mentioned within{}- curly braces is considered a parameter which can be replaced by a user defined string sent via the body in a POST request to the Schema Engine. When a template is dispatched, it interfaces with the Dispatcher to create new orders. - Templates are stored in a Supabase Postgres database and the REST-API is implemented with
fastapi
- Webview
- The webview is simply just a ui to manage the schema engine and the dispatcher.
- Allows for users to create templates,notifications and dispatch them to one or many targets. The Dipatcher can be toggled as well from this webview.
- The Webview is built with
react-router,tailwindcssandvite
The Schema Engine and the Dispatcher are meant to be deployed separately as their own separate services
Both the Schema Engine and the Dispatcher comes with its own Dockerfiles to allow for quick deployment. Alternatively the entire stack can be deployed with the docker compose.yaml
Demo:
Here i will demo only 2 of the core functionalities. In this demo i used my device’s Exponent Push Token from the ExpoGo app
- Dispatching a Simple Notifications
- Creating a Template and Dispatching an Order using it
Note that both these actions can be done programmatically via webhooks at <dispatcher>/dispatch and <schema-engine>/dispatch/<schema-id> respectively
Try it yourself
I’ve hosted all these services in my raspberry-pi homelab through Cloudflare Zero Trust Tunnels
| Dispatcher | pigeon-dispatcher.onetincan.tech |
| Schema Engine | pigeon-schema-engine.onetincan.tech |
| Webview | pigeon.onetincan.tech |
If any of these services are down and you would like to try them out just drop an email and ill deploy them
The Webview is especially very slow because of my cloudflare tunnel being throttled, use with patience and discretion
If you would like to try to build and deploy them yourself find the steps to do so down below
Telemetry
The Dispatcher can be linked with a Prometheus instance along with Grafana for telemetry. The Pigeon Dispatcher enables this by exporting metrics via the /metrics path
Here is a Grafana Panel for the Dispatcher
Deployment Steps
- Clone the Repo
1
  git clone https://github.com/TanmayArya-1p/Pigeon
Create .env Files
Create a
.envfile of the following format1 2 3 4 5 6 7 8 9 10 11 12 13 14
SCHEMA_ENGINE_PORT=5000 SCHEMA_ENGINE_AUTH_SECRET=nil SUPABASE_USER=postgres.mtcbvdyubwpysosyqsbt SUPABASE_PASSWORD=<lol> SUPABASE_HOST=aws-0-ap-south-1.pooler.supabase.com SUPABASE_PORT=6543 REDIS_HOST=redis-11698.c305.ap-south-1-1.ec2.redns.redis-cloud.com:11698 REDIS_PORT=11698 REDIS_PASSWORD=<lol> REDIS_CACHE_EXPIRE=1800 DISPATCHER_AUTH_SECRET=nil DISPATCHER_PORT = 8000 DELETE_TOKEN_WEBHOOK=blah
and drop them in
Pigeon.SchemaEngineandPigeon.Dispatcherdirectories- Deploy Docker Containers
1
  docker compose up
Run the Webview
CD into
Pigeon.Webviewand configure the application inapp/config.json- Install the required packages
1
npm i --force- Build and Serve
1
  npm run build && npm run start

